Whakapapa of the Harakeke

Without Tane, harakeke would not exist. This is a connection not only in ancestral heritage, but also in the practical aspects of nature and the environment. Whaka


Who is Hine Te Iwaiwa?

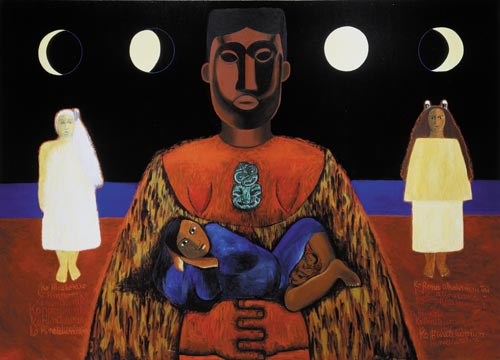
https://teara.govt.nz/en/artwork/27616/ko-hine-te-iwaiwa-ko-hine-korako-ko-rona-whakamau-tai

Hineteiwaiwa holds a woman giving birth. She wears a tiki, which is said in one tribal tradition to have been given to her by Tāne to assist with conception. Behind her are Hine-korako and Rona-whakamau-tai. Hineteiwaiwa, Hine-korako and Rona have important associations with birth in Māori tradition.

'Ko hine te iwaiwa, ko hine korako, ko rona whakamau tai'


What are the 3 baskets of knowledge according to Maori? 

Ko te kete tuauri: Knowledge of ritual, memory and prayer.

Ko te kete tuatea: Knowledge that is evil and harmful to mankind.

Ko te kete aronui: Knowledge that is helpful to mankind.


What is Te Aho tapu?

Te aho tapu, is the first and main thread of the korowai, weaves the whenu and aho of the korowai together. In the context of leadership, te aho tapu is dedicated to ngā mokopuna.


Name 3 things Maori used as natural dyes and what colour they produced.

Colours for dyeing muka were sourced from indigenous materials. Paru (mud high in iron salts) provided black, raurekau bark made yellow, and tānekaha bark made a tan colour. The colours were set by rolling the dyed muka in alum

Tanekaha: Image result for tanekaha tree

Kete Kumara

Start off by doing your whiri ends the traditional way or cheating way. You either need 48, 52 or 56 strips.

Once you’ve done your whiri ends you soften your strips.

softened strips asses.

Get a spear leaf, soften it and knot it at the top also shred it into three small strands.

Once you have three thin strands of flax you start to plait it around a centimeter long then start adding your whiri strips onto it and plait it tightly together so the whiri doesn’t come out.

plait

Once all the ends are in lay it down and count your strips on each side making sure its even.

Tie on side softly with flax so it doesn’t get mixed in with the other strands.

To begin weaving, place the first piece on an angle to the right, and bend the top strip back over to the left.

The second piece is placed to the right of the first and the top strip bent back over it to lie parallel with the strip to the left.

Place the third piece to the right of the others and bend the top strip back over one and under one.

The fourth piece is placed to the right of the others and the top strip bent back over one, under one and over one. There will now be four strips to the left and four to the right.


Harakeke plants

Potaka:

Description:  Tall, slightly bendy, blue-green leaves with powdery blue underside. Similar to Ruawai. Black margin and keel.

Uses:  Mature blades strip well with shell into long strands of fine, silky fibre. Very good for kete as it dries very white when boiled for one minute.

Muka extraction:  Medium amount of muka. Doesn’t extract cleanly and para is hard to scrape off with knife. Not a muka flax.

Raranga (unboiled):  Whenu easy to soften and long. Ideal for whāriki (mats). Whenu pliable and slightly waxy. Good raranga (weaving) flax.


potaka


Ruawai:

Description: Tall, rather bendy leaves. Bright, light blue-green blades. Silver-blue, powdery underside. Black margin and keel. Orange keel and black margin on young leaf. Silver-purple shadings at base of plant. Similar to the cultivar Kōhunga.

Uses:  Grown widely on the East Coast and prized for its long, white silky fibres of superior quality. Strips easily and cleanly. Ideal for whenu (warp) and aho (weft) for kaitaka, korowai and muka kete. Used in kaitaka kete as it dries white when boiled for one minute. Babies on the East Coast were once placed in tightly woven baskets for almost the first year of their lives. They were covered with a bundle of silky muka fibres which could be changed and washed.

Muka extraction: Muka extracts cleanly, para sticks to fibre. Medium to small amount of fibre.

Raranga (unboiled): Easy to soften, edges do not fray. A good raranga (weaving)  flax.

ruawai


Taeore: Description: A fine variety. Tall, bendy, pale blue-green leaves, powdery blue on reverse. Similar to Kōhunga but finer and slightly more droopy. Black margins and keel. Plenty of very tall, light-weight flower heads.

Uses:  Easily stripped into long strands of strong, silky white fibre using haro method. Fibre used for aho in high quality cloaks. For kete, leaves dry to a pale fawn when boiled and a deeper colour when unboiled. Fibre in muka kete dries to a soft cream colour. Strips prepared for kete and whāriki will not shrink after being woven, if boiled or dragged through boiling water before weaving. The stalks and seed pods have provided Rene with a fine range of apricot toned dyes for her handspun wool.

Muka extraction: Muka extracts fairly easily but not cleanly. Leaf matter sticks to fibre especially around incision. Para removes easily. Rene Orchiston regards this flax as a muka cultivar. It could be because of the time of year or location (South Island) that our flax performs differently.

Raranga (unboiled): Beautiful, soft, leathery. Great for raranga. When softening, tip of whenu sometimes splits.

taeore


Takirikau:

Description:  A favourite of the Ngāti Porou. The term tākirikau (like tīhore) is applied to all the finer cultivars of flax which can be stripped of fibre without the use of a shell (i.e., with the fingers only). A very handsome harakeke, growing at times up to 3 metres high. Straight, very strong, pale yellowy-green leaves. Bright yellow-orange margin and keel. Small number of very high, heavy kōrari.

Uses: A real whītau harakeke, producing long strands of strong, shiny fibre. Could be good for strong whenu (warp) in weaving. Very good piupiu variety, particularly for ladies piupiuóeasy to prepare, has plenty of length and dries hard and very strong. Dries to a pale clear yellowy cream when boiled for one minute. Unboiled, has a little more greenish tone.

Muka extraction:  Muka extracts effortlessly and cleanly. Para removes easily.

Raranga (unboiled):  Even while harvesting, leaves feel soft, leathery, and pliable. Dead leaves also feel soft. Similar to Kōhunga. Edges fray, strands of muka keep separating from whenu when softening.

takirikau.jpg


Tapoto:

Description: A real tīhore variety and one of the favourites of Hawke’s Bay Māori. Once prevalent where Havelock North now stands. Strong, straight, short narrow blades tapering to a sharp point. Pale yellow-green leaves with bright orange keel and margins. Very fine, tall flower stalks. Similar to Tākirikau, but generally smaller.

Uses:  Muka variety. Strips easily and cleanly into long, shiny, white fibre, brittle but very strong. Very good piupiu harakeke. Dries very hard to a pale cream colour. Used for kaitaka, whāriki and kete.

Muka extraction: Muka extracts well, some leaf matter sticks to fibre. Para removes well. Fibre is dull and easily “fluffs” up when cleaned. Fibre feels strong.

Raranga (unboiled): When softening, whenu often split lengthwise and edges fray. It performs like a typical muka flax, only fibre doesn’t release well. Whenu once softened are waxy and keep tension well. Thick butt ends and thin tips make for uneven weaving.\

Tapoto


Karakia

Maori:

Te Harakeke, Te korari

He taonga whakarere iho

O te rangi. O te whenua. O nga tupuna

Homai he oranga mo matou

Tihei mauri ora.


English:

Flax

The treasure passed down to us by the sky,

The land the ancestors give us health

For our life force

Amen.


for our life force.

Muka extraction

Make as many strips out of your flax that you can.

Take the knife and hold it like you would hold a pen, cut on small light line near the butt of the flax.

Make sure your cut is not to deep or too light just enough so you can see the bend in it

Get your mussel shell and put the straight edge of the shell to the cut facing towards the end of the butt.

Grasp the rest of the leaf and pull so you extract muka out of the butt.

Repeat this process but going towards the top of the leaf.


Glossary

Aho: Cross threads of weaving.
Ara: Line of weaving before you start your finishing edge.
Muka: Prepared flax fibre. White strands of flax fibre from flax leaves.
Para: Wax from the flax leaves/ Left over pieces stripped off in preparing flax.
Korari: Flower stem of the flax.
Karakia: A prayer to bless/ thank something or someone.
Putake: To originate.
Whakapapa: To lay flat.
Kuku: green lipped muscle shell used to extract muka.
Korowai: Cloak made of muka in modern times.
Harakeke:  an important native plant with long, stiff, upright leaves and dull red flowers. Found on lowland swamps throughout Aotearoa/New Zealand. It has straight, upright seed pods. This is a general name for the harakeke leaf and the plant itself, but each different variety has its own name.
Raranga: To weave.
Whatu: Fibre weaving.
Haro: Scraping of the muka.
Hapine: To scrape flax.
Rau: To put into, gather into, place into.
Rito: Center shoot, baby of the flax bush.
Awhi rito: Leaves that embrace the center shoot.
Kete: Basket/ kit.
Maripi: To make a cutting movement.
Konae: Small basket/ purse woven from flax.
Tapiki: To lock off/ finish the piece of weaving.
Takitahi: Single/ individual.
Whenu: Strand (of a cord), warp – lengthwise threads of a woven flax garment.
Whiri: To twist/ plait/ weave or spin.

4 corner Konae

Take off spine and edges.

actual whiri 1

Get at least 4 strips per leaf. Make sure your strips are the same size.

4 strips

You will need either 12 or 16 strips, any amount that is dividable by 4.

Once you have softened your strips make a woven square over and under each other. You should have an even amount of strips each side.

IMG_0334

Once you have your square peg all four corners to make it secure.

Get the two middle strips from one side and place the over strip across diagonally and the take the under strip and cross it over the over one. So that the over strip goes under the under one. Do this to 3 more strips.

konae 4 1.JPGkonae 4 2konae 4 3

Repeat this step to each side of the square.


Once  this step is done you’ll notice that the strips will want to be woven together. after you weave the strip together you find the ara and finish off with a finish of your choice.


Konae

Start with an even amount of strips (14, 16, 18, 20)

Lay them diagonal across

Fold back an “under” lay another strip next to it then fold back into position

Repeat this process until an even number of strips are on each side

IMG_0334

Add pegs to two diagonal corners

Corners:

To complete the corners correctly you must take the under strip fold it straight across then take the over strip and place it on top to make a over under woven pattern. Repeat this step three more times to make a square that is woven.

konae 1

Do the same with the opposite side of your square.

konae 2.JPG

After this step is complete you peg the woven squares and pull the outwards and fold the konae in half long ways.

konae 3.JPG

Start weaving the strips together to form the small purse.

konae 4.JPG

Finish of with the edge of your choice.

konae 5.JPG

Mau ringa

  1. You begin by taking the spine and edge out. By doing this the flax will have ended up in two separate parts.


spine

2. Second step, you have either side of the flax making two smaller strips than the big one. While halving the strand you pull it down till it resists, then chop the two strands off.


bracelet

3. The two strands you have chopped off have to be softened. You soften the strip by using the blunt side of a knife. Starting from the middle to the bottom and then from the middle to the top. By doing it this way it won’t ruin the flax.two seperate strips (mau ringa)


4. Place one strand of flax around your wrist measuring the size you want for your mau ringa, when done measuring how big you want it, secure it with a peg.


sizing

5. When finished pegging your size, split that same flax into 4 different strands but don’t split it any further than the peg.

4 STRIPS BRACELET

6. With the other strand of flax that you haven’t used, also split that into 4, giving you extra strands if you run out while weaving onto your mau ringa.

4 and 4


7. You start the mau ringa by leaving the first and third strip up, and the second and  fourth strip down. While doing that, place a strand you have split separately onto the flax while wrapping it around and continuing the same pattern, one up one down etc.


mau ringa

8. When you run out of flax to weave, you place another strip over top and continue to do the pattern.

9. When you have continued the pattern and have continued it all around the mau ringa. You tuck all your endings of the flax inside the same on going pattern. By doing this it will make your mau ringa stronger.

Putiputi

  1. Take out the spine and the edges.

spine

2. Slit into 8 pieces, 4 strips each side take it as far down as you can until it resists naturally. (split each half in half)


4 strips8 strips


3. Soften each strip using the blunt side of the knife on the dull side. Soften upwards towards the tip of the flax only once because you don’t want to scratch the colour off. Then soften going down wards twice so you know the strip is soft.

softeningsoft flax.JPG

4. The strips will be one up one down. The ones that are down are folded back.up down strips


5. The first strip up is folded across.

strip accross

6. Lift up the folded down ones so they’re all back in the same position.

first woven strip

7. Repeat 4 times for each side of the puti puti.


four sides

8.Tie it tight when you’re finished to keep it together.

raranga


Whiri ends

Traditional method:

  1. Take the spine out, pull it until it resists.

actual whiri 1.JPG

2. Pull down on the strip closest to the spine.

actual whiri 2.JPG

3. Fold the strip onto itself, dull side to dull side.

actuall whiri 3

4.Place the front part of your palm (thumb) onto the crease

actual whiri 4

5. Place the butt of the flax under your arm


6. Grip the strip with your other hand.

whiri 234.JPG

7. Grip firmly and pull at the same time.

grip

8. Follow through with the grip and pull.


follow.JPGwhiri finish.JPG


Modern Method

Prepare strip- cut it out.

On the dull side make a cut part of the way through 10cm from the butt/ thick end.

With a butter knife soften on the shiny side of the cut to peel off the “para” (wax)

Comb the end.

Tapiki finish

1.set ARA so its even and straight and makes a line around the Konae (BLUE) #1 will stay up. #2 fold on itself (GREEN)

tapii 1

2. Make sure #2 is creased to secure the ARA (GREEN)

tapiki 2.JPG

3. strip #3 is placed on top of stop #1

tapiki 3.JPG

4. fold strip #1 over strip #3 in the opposite direction

tapiki 4

5. Place strip #2 over strip #1 – strip #2 becomes strip #1 and repeat     * fold all blue        strips in a “V” shape. Tuck under all strips.

tapiki finish

Blog at WordPress.com.

Up ↑